Migrating your data from SQL Server to PostgreSQL may appear challenging, but by implementing the appropriate techniques and utilizing the right tools, it can be an effortless and productive process.
This article deep-dives into the step-by-step guide for the migration from SQL Server to PostgreSQL, including valuable recommendations to ensure a seamless transition.
But first we need to ask: why should you migrate data from SQL Server to PostgreSQL?
SQL Server vs PostgreSQL
Capturing data from SQL Server to PostgreSQL can offer distinct advantages, such as support for a wider range of data types and exceptional scalability, which sets it apart from SQL Server.
Migrating data from SQL Server to PostgreSQL also may become necessary due to various business reasons, such as company acquisitions or changing business requirements. If you are considering transferring data, capturing it from SQL Server to PostgreSQL can be a smart choice. There are multiple reasons that make capturing data from SQL Server to PostgreSQL a valuable choice. Mentioned below are some of the key differences.
| Feature | SQL Server | PostgreSQL |
| Licensing | Proprietary software that requires licensing fees | Open-source software available for free |
| Flexibility | The level of flexibility is restricted or constrained. | Easily adaptable and versatile, with extensive customization options. |
| Cross-Platform support | Only runs on Windows and Linux | Operates seamlessly across a diverse array of operating systems, such as Windows, Linux, and macOS. |
| Community support | Active community of developers and users who contribute to its ongoing development and support | Robust and comprehensive community support, offering a wealth of resources, documentation, and assistance to the users. |
| Data types | Offers extensive support for various data types, including but not limited to string, numeric, and date/time data types. | Facilitates a comparable array of data types, albeit with certain distinctions in both syntax and behavior. As a result, it provides users with a more diverse set of options to manipulate their data. |
Capturing data from SQL Server to PostgreSQL using SSIS
Capturing data from SQL Server to PostgreSQL using SSIS is a popular data integration task.
SSIS (SQL Server Integration Services) is a robust platform that allows you to build high-performance data integration solutions with data extraction, transformation, and loading capabilities. By using SSIS, businesses can seamlessly extract data from SQL Server and load it into PostgreSQL, ensuring smooth and efficient data handling. With a suite of built-in components and tools, SSIS streamlines data integration, making it an ideal option for organizations looking to capture and transfer data between SQL Server and PostgreSQL.
Capturing data from SQL Server to PostgreSQL using SSIS involves the following steps:
Step 1: Install the PostgreSQL ODBC driver
Before you start migrating data, you need to install the PostgreSQL ODBC driver on the machine where SSIS is installed. You can download the driver from the PostgreSQL website.
Step 2: Create a new SSIS package
Create a new SSIS package in SQL Server Data Tools (SSDT) by following these steps:
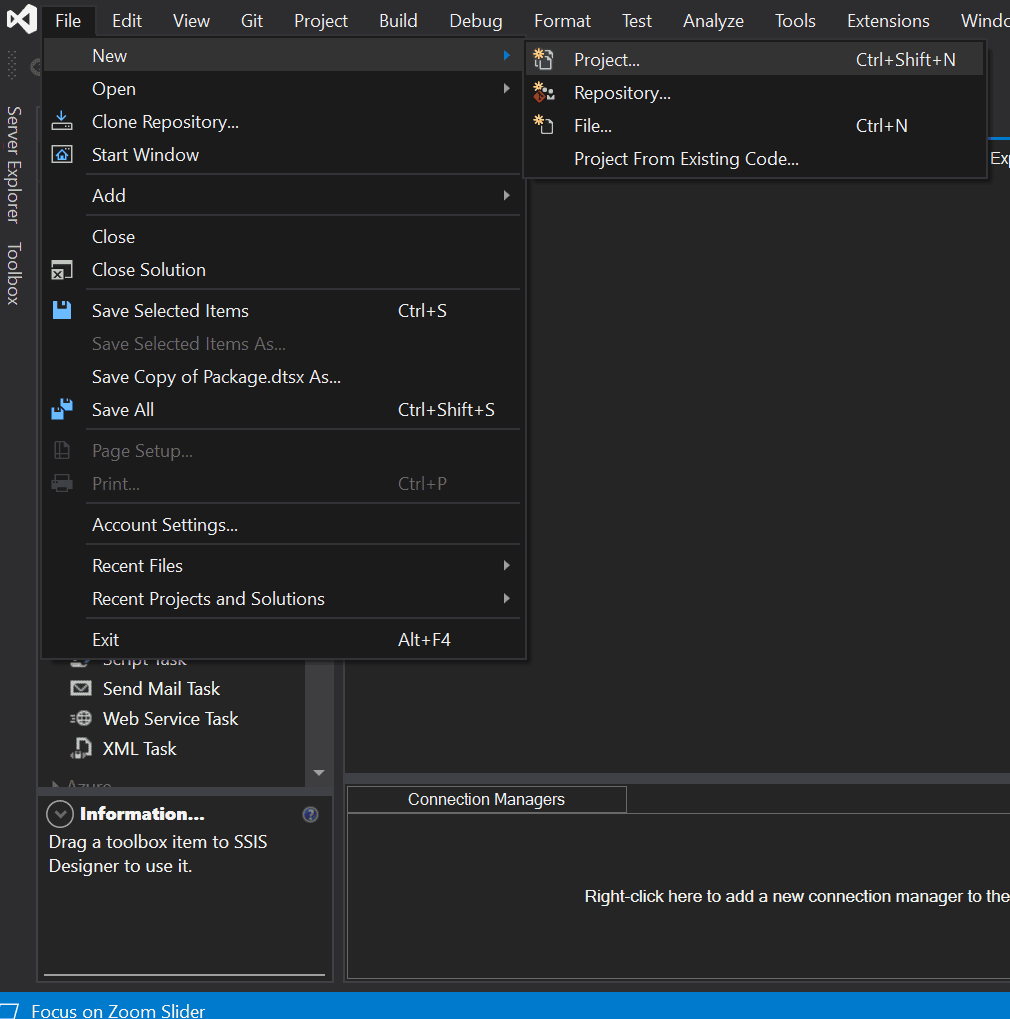
- Open SQL Server Data Tools. Select File > New > Project.
- Select Integration Services Project, and then click OK.
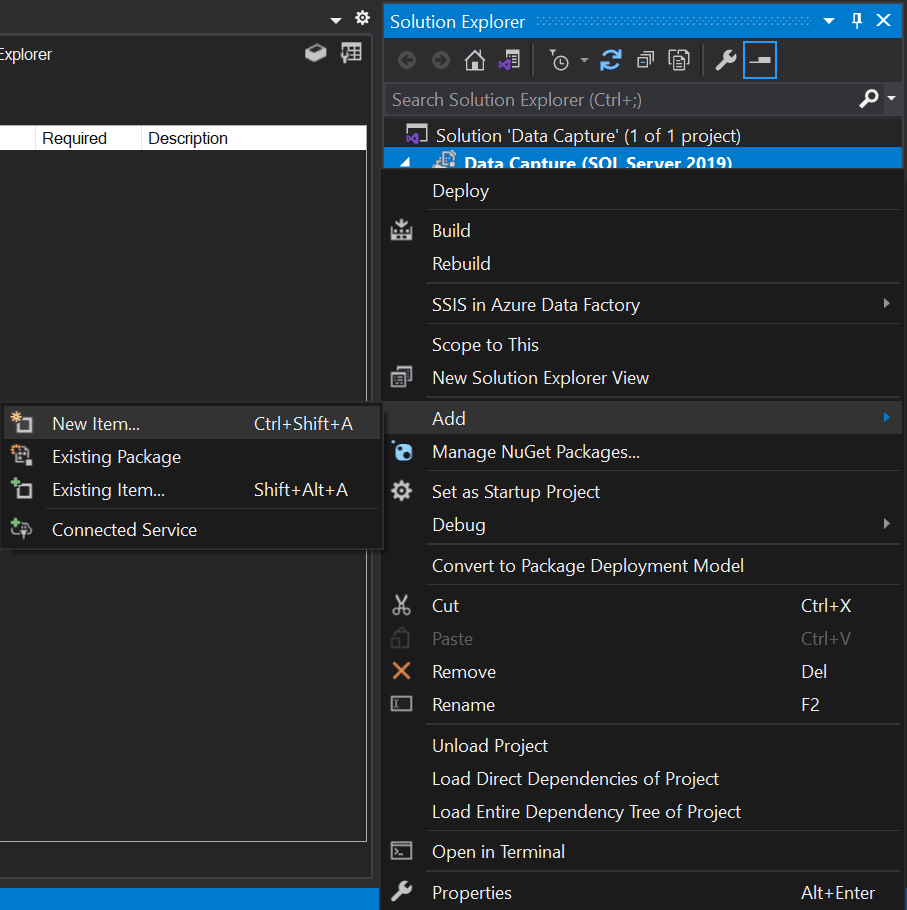
- In the Solution Explorer window, right-click the project name and select Add > New Item.
- Select SSIS Package, and then click Add.
Step 3: Add a Data Flow task
Add a Data Flow task to the Control Flow tab of the package by following these steps:
- Open the package in SSDT.
- In the Control Flow tab, drag and drop the Data Flow task from the SSIS Toolbox to the design surface. For more, see the data flow documentation.
Step 4: Add a Source component
Add a Source component to the Data Flow task and configure it to connect to the SQL Server database by following these steps:
- Open the Data Flow task in SSDT.
- In the Data Flow tab, drag and drop the OLE DB Source component from the SSIS Toolbox to the design surface.
- Double-click the OLE DB Source component to open the OLE DB Source Editor.
- In the OLE DB Source Editor, click the New button to create a new connection to the SQL Server database.
- Enter the connection details for the SQL Server database and click Test Connection to make sure the connection is successful.
- Select the table or view that you want to migrate data from in the Name of the table or view drop-down list.
Step 5: Add a Destination component
Add a Destination component to the Data Flow task and configure it to connect to the PostgreSQL database by following these steps:
- In the Data Flow tab, drag and drop the ODBC Destination component from the SSIS Toolbox to the design surface.
- Double-click the ODBC Destination component to open the ODBC Destination Editor.
- In the ODBC Destination Editor, click the New button to create a new connection to the PostgreSQL database.
- Enter the connection details for the PostgreSQL database and click Test Connection to make sure the connection is successful.
- Select the table or view that you want to migrate data to in the Destination table or view the drop-down list.
Step 6: Map columns
Map the columns from the source to the destination by following these steps:
- In the Data Flow tab, click on the OLE DB Source component to select it.
- In the Properties window, click on the Output Columns property to open the Output Columns Editor.
- Select the columns that you want to migrate by checking the box next to their names.
- Click the OK button to close the Output Columns Editor.
- Click on the ODBC Destination component to select it.
- In the Properties window, click on the Mappings property to open the Mapping Editor.
- Drag and drop the source columns from the Available Input Columns pane to the corresponding destination columns in the Available Destination Columns pane.
- If necessary, you can use the Transformations pane to apply transformations to the data as it is being migrated.
- Click the OK button to close the Mapping Editor.
Step 7: Set up error handling
Set up error handling in the package to handle any errors that may occur during the migration process by following these steps:
- In the Control Flow tab, drag and drop an Error Output component from the SSIS Toolbox to the design surface.
- Connect the Error Output component to the Data Flow task.
- Double-click the Error Output component to open the Error Output Editor.
- Select the appropriate error handling option for each error output, such as redirecting the error rows to a flat file or logging the errors to a database.
Step 8: Execute the package
Execute the package and monitor the progress using the Progress tab by following these steps:
- Click the Execute button in the toolbar or press the F5 key to run the package.
- Switch to the Progress tab to monitor the progress of the package.
- After the package completes successfully, verify that the data has been migrated to the PostgreSQL database.
That’s it! You have successfully captured data from SQL Server to PostgreSQL using SSIS.
To keep in mind while capturing data from SQL Server to PostgreSQL
Here are a few things that you need to make a note of for a successful Data migration:
- Plan ahead: Before initiating the migration process, it’s essential to conduct a thorough analysis of your existing database to identify potential issues that could impact the migration process. By addressing these issues early on and optimizing your database, you can streamline the migration process and avoid unexpected obstacles.
- Test thoroughly: The key to a successful migration is to plan and execute the process with precision. Make sure to carefully evaluate your requirements and choose the right tools for the job. Proper planning and execution can help minimize risks and ensure a smooth transition from start to finish.
- Monitor performance: To ensure optimal performance after migration, it’s important to monitor the PostgreSQL database regularly and promptly address any performance issues. By proactively optimizing your database, you can enhance user experience and ensure seamless operation.
- Seek help if needed: In case you face any challenges during the migration process, it’s recommended to seek assistance from experienced professionals specializing in SQL Server and PostgreSQL migration. This can help you overcome any obstacles and ensure a successful migration with minimal disruption to your operations.
- Back up data: Backing up your data is a critical step before beginning the migration process. It’s vital to create backups of all data to ensure that no essential information is lost during the migration. In addition to preventing data loss, backups can help you recover from potential errors or issues that may arise during the migration process.
Data migration can be a lengthy, time-consuming, and labor-intensive process that involves many manual steps. To ensure a successful migration, it is essential to have a comprehensive understanding of the data and the structure of both the source and destination databases. Additionally, data accuracy and tracking the migration process are critical to avoid any data loss or corruption during the transfer.
Using a reliable and efficient data migration tool can significantly reduce the time and effort required for the process, resulting in a smoother and more successful migration. Therefore, it is essential to have access to the right tools and resources to make the data migration process as seamless and efficient as possible.
That’s why we use Estuary Flow to take care of all of these.
Estuary Flow is a powerful data integration tool that seamlessly integrates with a wide range of open-source connectors, providing you with the ability to extract data from sources like SQL Server with low latency. This data can be replicated to various systems for both analytical and operational purposes, and you can choose to organize it into a data lake or load it into other data warehouses or streaming systems. In this case, we’ll use it to replicate data to PostgreSQL
Capture Data from SQL Server in Real Time
To capture data from SQL Server databases with ease, Estuary Flow is the perfect tool for the job. Flow includes a change data capture integration for SQL Server, which you can set up without code.
Follow these simple steps to start:
- Configure your SQL Server database to meet the prerequisites.
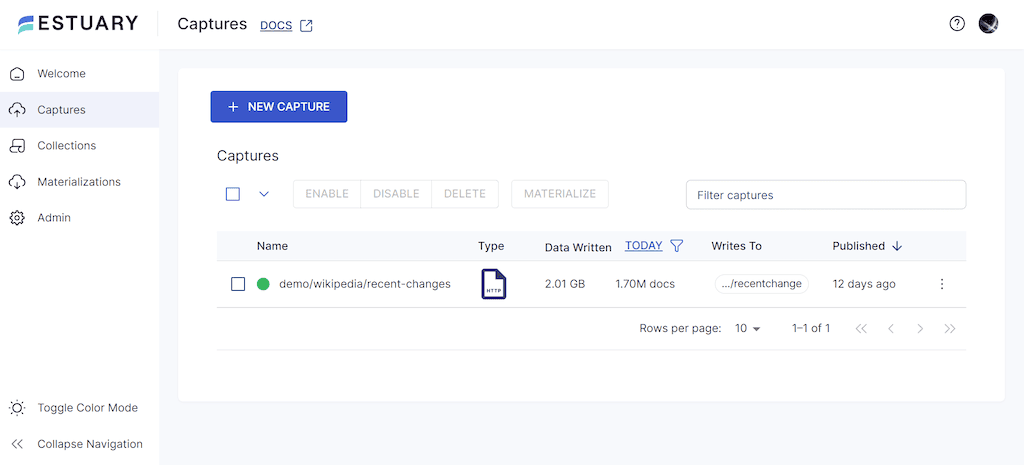
- Register or log in to the Estuary Flow web application and go to the Captures page.
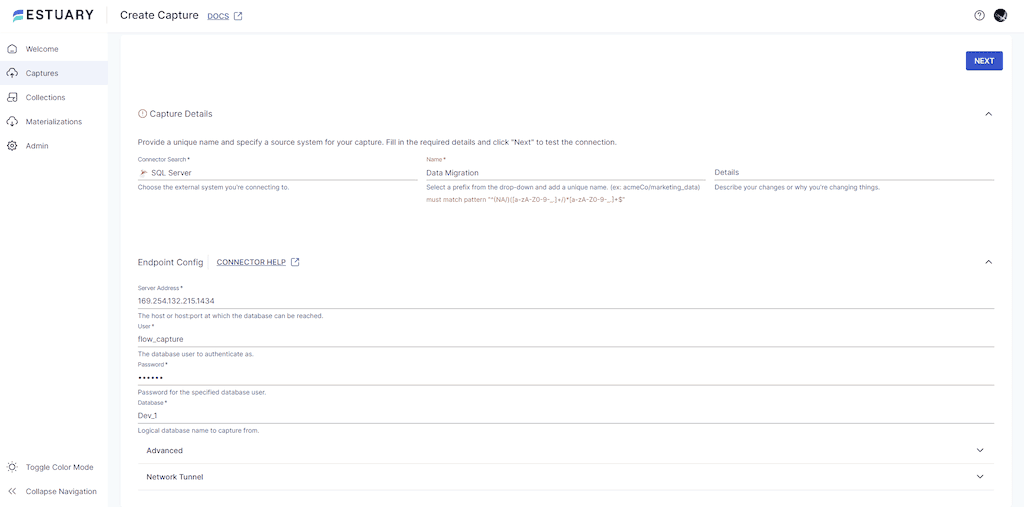
- Click on the New Capture button and select the SQL Server connector to open a form with the required properties.
- Enter a unique name for your capture with your Estuary prefix and fill in the Endpoint Config section with the necessary details like server address, database user, password, and database name.
- Once done, click Next and Flow will test the connection to your database and create a list of all the tables that can be captured into Flow collections.
- Review the collections and remove any you don’t need to sync to your destination database.
- If you made any changes, click Next again, and then click Save and Publish to finalize the data capture.
- You’ll receive a notification once the data capture is complete. Click the Materialize Collections button to proceed to the next phase of the migration process.
Materialize Data to PostgreSQL in Real Time
With Estuary Flow’s open-source materializations, you can effortlessly direct data to Postgres, keeping databases up to date with minimal costs, and ensuring millisecond latency. This guarantees that your data remains accurate and up-to-date, empowering you to make informed decisions based on the latest information.
To set up a PostgreSQL database for real-time data pipeline, follow these steps:
- Choose the PostgreSQL tile and fill out the Endpoint Config properties.
- Provide the PostgreSQL database name and credentials for authentication.
- Click Next to allow Flow to check the connection to PostgreSQL, and open up the Collection Selector with pre-filled details of the captured collections that will become new tables in PostgreSQL.
- Click Save and Publish to complete your Data Flow, and receive a notification once the process is successful.
With these straightforward steps, Estuary Flow enables you to capture data from SQL Server databases and transfer it to your desired destination database in no time. This solution enables the entire team to have a real-time data pipeline from SQL Server to Postgres at their fingertips.
Explore our guide for loading data from SQL Server to various other databases.
Make data migration effortless with Estuary Flow's no-code, real-time pipeline from SQL Server to PostgreSQL. Start your free trial or contact us for any assistance.
Conclusion
Capturing data from SQL Server to PostgreSQL can significantly improve your business’s data management and scalability with its advanced features and capabilities. To ensure a seamless and productive migration, it is crucial to follow a step-by-step guide and use the appropriate techniques and tools. By doing so, you can guarantee a smooth transition and reap the rewards of PostgreSQL’s advanced functionality.
Estuary Flow supports a wide range of data sources and destinations, including SQL Server, PostgreSQL, and BigQuery. This makes it a versatile option for businesses that need to migrate data across different platforms.
Give it a try with a free account, and reach out to us in the community with any questions or comments.
Further Reading:
- https://dba.stackexchange.com/questions/10687/copying-the-database-from-sql-server-to-postgresql
- https://learn.microsoft.com/en-us/sql/integration-services/import-export-data/connect-to-a-postgresql-data-source-sql-server-import-and-export-wizard?view=sql-server-ver16
- https://stackoverflow.com/questions/24078337/how-to-export-data-from-sql-server-to-postgresql
- https://cloud.google.com/learn/postgresql-vs-sql#:~:text=In%20regards%20to%20programming%20language,for%20Java%2C%20JavaScript%20(Node.

Author
Popular Articles


