Effective customer relationship management (CRM) is the core for building and nurturing valuable customer connections. However, traditional CRM systems often face challenges in effectively managing the vast amount of customer data. These challenges include data silos, complex data integration processes, and limited analytical capabilities, which hinder organizations from extracting valuable insights and streamlining their business processes to drive business growth.
The solution? Integrating Salesforce, a leading CRM platform, with Snowflake, a robust data warehouse, using a dedicated Salesforce Snowflake connector. This integration breaks down data barriers, streamlines data integration, and unlocks the full potential of your customer data.
This guide will provide a roadmap and best practices for connecting Salesforce to Snowflake. So, let's dive in!
Salesforce Overview
Salesforce is a leading cloud-based customer relationship management (CRM) platform that empowers you to manage and optimize your sales, marketing, and customer service processes. It offers services such as lead generation, analytics, marketing intelligence, field service management, and personalized customer experiences.
Here are some of the key features of Salesforce:
- Reporting and Analytics: Salesforce's built-in reporting and analytics capabilities allow you to gain valuable insights into your sales, marketing, and customer service data. Create custom reports, dashboards, and visualizations to track key metrics, identify trends, and make data-driven decisions.
- Automation and Workflow Management: Salesforce offers automation features like workflow rules and a process builder. These features allow you to streamline repetitive tasks, automate processes, and ensure consistent follow-ups, saving time and improving efficiency across your organization.
- AppExchange Marketplace: Salesforce’s AppExchange is a vast marketplace that offers a wide range of pre-built applications and integrations. You can explore and install apps tailored to your specific needs, further enhancing the capabilities of your Salesforce implementation and extending its functionality.
Additionally, Salesforce Data Cloud is part of Salesforce's offerings, emphasizing its role in data management and integration capabilities, particularly in setting up data shares and configuring permission settings. - Data Security and Privacy: Salesforce prioritizes data security by following industry-standard practices and compliance regulations. It offers Salesforce Shield, which includes data encryption, event monitoring, and audit trails. These features work together to safeguard the confidentiality and integrity of sensitive information, ensuring that your data remains protected.
Snowflake Overview
Snowflake is a fully-managed and enterprise-ready Software-as-a-Service (SaaS) platform. It is a highly scalable data warehousing solution, providing a centralized repository for storing structured, unstructured, and semi-structured data. With Snowflake, you can seamlessly handle diverse data types and easily scale your storage and computing resources as needed. This ensures you have a robust and flexible data warehousing platform to efficiently manage and analyze data, enabling you to unlock valuable insights and make data-driven decisions. The Snowflake Data Cloud enhances this capability by providing a unified and frictionless modern data stack that supports data integration, sharing, and insights.
Here are the key features of Snowflake:
- Elastic Scalability: Snowflake offers exceptional elasticity, allowing you to scale your data warehousing resources up or down based on your needs. It automatically handles infrastructure provisioning, ensuring optimal performance regardless of data size or complexity.
- Multi-Cloud Flexibility: Snowflake operates across multiple cloud providers, including Microsoft Azure, Amazon Web Services (AWS), and Google Cloud Platform (GCP). This flexibility allows you to choose the cloud provider that best suits your requirements, ensuring seamless integration with your existing infrastructure.
- Supports Semi-Structured Data: Snowflake offers native support for semi-structured data, such as JSON, XML, Avro, and Parquet. It allows you to ingest, store, and query your semi-structured data without the need for complex transformations. Snowflake's schema-on-read approach also enables direct querying and analysis of semi-structured data using SQL.
- Separation of Storage and Compute: Snowflake's unique architecture allows you to scale computing and storage resources independently. With auto-sensing, compute resources can scale automatically during queries without disruption or data redistribution. Storage resources can be scaled to any desired capacity without unnecessary computing costs. Both resource groups can be customized, scaled up or down, and even suspended. This flexibility ensures optimal performance, cost efficiency, and adaptability for your specific requirements.
Importance of Connecting Salesforce to Snowflake
Connecting Salesforce to Snowflake brings numerous advantages and unlocks powerful data management and analysis capabilities. Here are a few key reasons why connecting Salesforce to Snowflake is beneficial:
- Comprehensive Data Warehousing: Connecting Salesforce to Snowflake facilitates data integration with other systems and sources. You can combine Salesforce data with data from marketing tools, ERP systems, or external data sources, creating a unified view for comprehensive analysis and insights. Snowflake's ability to handle diverse data formats, such as JSON, Avro, or Parquet, further enables advanced analytics across multiple data sources.
- Advanced Analytics: Snowflake offers advanced analytics capabilities, allowing you to perform complex queries, aggregations, and transformations on Salesforce data. With Snowflake's SQL-based querying language, you can gain deeper insights, generate custom reports, and perform data analysis at scale. Snowflake's powerful processing capabilities and parallel execution enable fast and efficient analytics, even with large datasets.
- Real-Time Data Availability: Integrating Salesforce with Snowflake enables real-time or near-real-time data synchronization. This ensures that your analytics and reporting are always up to date and reflect the latest information.
4 Easy Methods to Connect Salesforce to Snowflake
There are several methods available for replicating data from Salesforce to Snowflake. This guide will explore popular ways to link Salesforce data to Snowflake.
- Method 1: Using Tableau CRM Sync Out for Salesforce to Snowflake
- Method 2: Using Bulk API for Salesforce to Snowflake Data Migration
- Method 3: Using Data Loader for Salesforce to Snowflake Integration
- Method 4: Replicate Salesforce Data to Snowflake with Estuary Flow
Method 1: Using Tableau CRM Sync Out for Salesforce to Snowflake
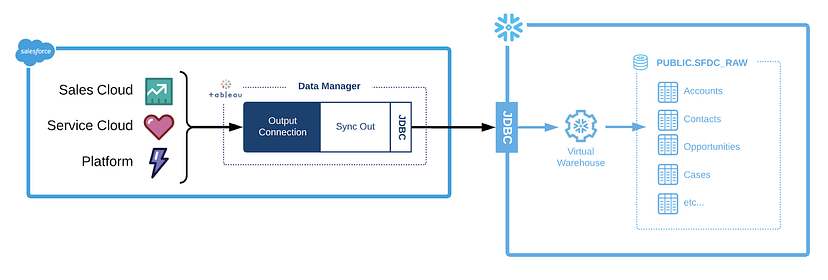
With Salesforce's acquisition of Tableau in 2019, you can conveniently connect and transfer your Salesforce data to Snowflake using Tableau Data Manager. This method will establish a remote connection using the Snowflake output connector to transfer data from CRM Analytics to a Snowflake table. Then, we will use the Sync Out feature to push the raw data from CRM Analytics directly to Snowflake.
To connect Salesforce to Snowflake, follow these steps:
Step 1: Configuring the Snowflake Output Connection in Salesforce
To use the Sync Out feature with Snowflake, you need to set up the following Snowflake objects in your Snowflake account:
- Database and Schema: You must create a database and schema to store Salesforce data.
- Warehouse: A warehouse in Snowflake is a computational resource that allows you to load and process data. For Sync Out, it is recommended to use an XSMALL or SMALL warehouse size, which provides sufficient resources for the task.
- Role: A role in Snowflake defines a set of permissions and privileges for users. You need to create a role with the necessary permissions on the warehouse and privileges on the database and schema.
- User: Finally, you must create a user and grant them the role as mentioned above. This user will be associated with the role and have the privileges and permissions necessary to perform data synchronization activities with Snowflake.
Here's a simplified script to create the Snowflake objects:
plaintextUSE ROLE SECURITYADMIN;

CREATE ROLE SYNCOUT;

CREATE USER TCRMSYNC PASSWORD = '<your password>' LOGIN_NAME = 'TCRMSYNC' DISPLAY_NAME = 'TCRMSYNC'
DEFAULT_ROLE = SYNCOUT  DEFAULT_WAREHOUSE = 'SYNC_WH' DEFAULT_NAMESPACE = 'SFDC_DB.PUBLIC' MUST_CHANGE_PASSWORD = TRUE;

GRANT ROLE SYNCOUT TO USER TCRMSYNC;

USE ROLE SYSADMIN;

CREATE OR REPLACE WAREHOUSE SYNC_WH
WITH WAREHOUSE_SIZE = 'XSMALL'
AUTO_SUSPEND = 60
    INITIALLY_SUSPENDED = TRUE
AUTO_RESUME = TRUE;

GRANT ALL ON WAREHOUSE SYNC_WH TO ROLE SYNCOUT;

CREATE DATABASE SYNC_DB;
CREATE SCHEMA SYNC_DB.SYNCOUT;
GRANT USAGE ON DATABASE SYNC_DB TO ROLE SYNCOUT;
GRANT USAGE, CREATE TABLE, CREATE STAGE ON SCHEMA SYNC_DB.SYNCOUT TO ROLE SYNCOUT;
GRANT SELECT, INSERT, UPDATE, DELETE, TRUNCATE ON FUTURE TABLES IN SCHEMA SYNC_DB.SYNCOUT TO ROLE SYNCOUT;
This script will create a role, a user associated with that role, a warehouse, a database, and a schema. It grants the role and user-appropriate permissions for accessing and manipulating the Snowflake objects.
Step 2: Enabling Sync Out for Salesforce Objects
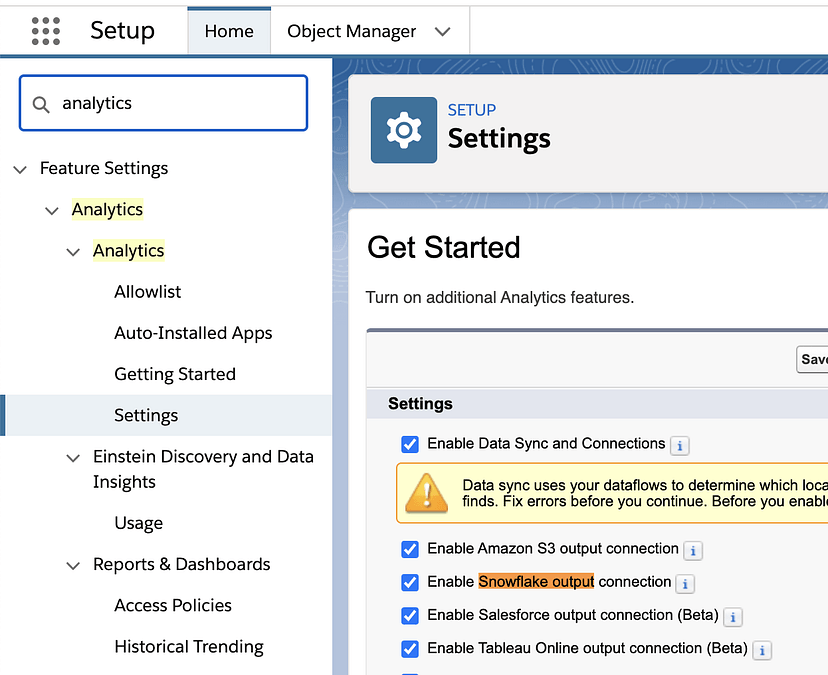
Firstly, you have to enable Sync Out connection in Salesforce. Go to Setup > Analytics > Settings and check the Enable Data Sync and Connections and Enable Snowflake output connection checkbox.
Step 3: Set up the Output Connection
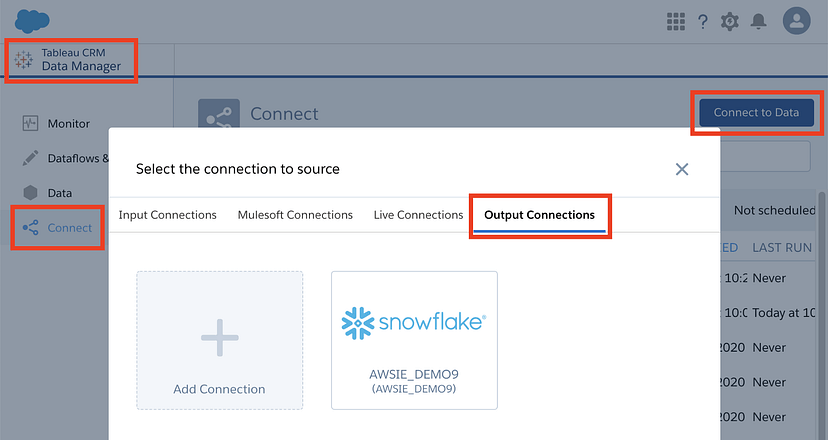
Go to Connect > Connect to Data > Output Connections in Tableau CRM Data Manager. Click on Add Connection, select the Snowflake Output Connector, and enter the Snowflake credentials.
Step 4: Enable Sync Out for SFDC_LOCAL objects
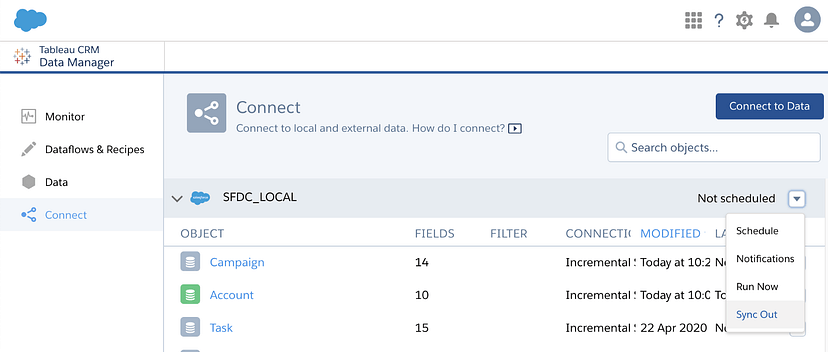
Now, you must inform Tableau CRM that you want to push data to Snowflake. Open Tableau CRM Data Manager, go to Connect and click the down arrow on the right in the SFDC_LOCAL bar. Click on Sync Out and enable it by providing appropriate details. If you can't see the option, contact Salesforce Support for assistance.
Step 5: Sending and Verifying Data Transfer to Snowflake
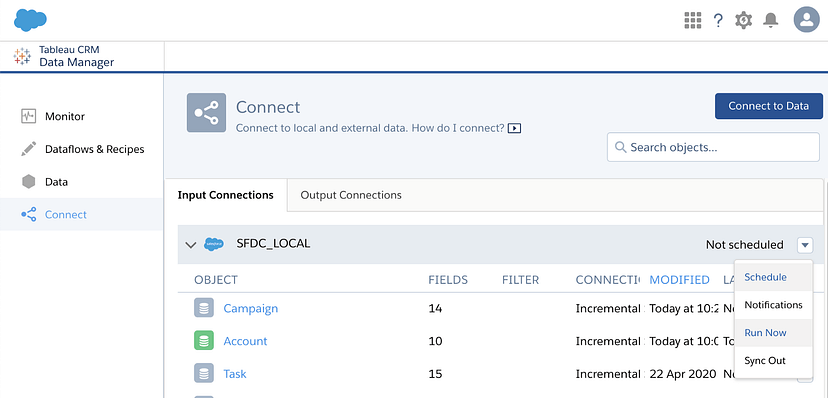
In the SFDC_LOCAL bar, click the down arrow and choose Run Now to send all data to Snowflake. To sync a specific object, click the down arrow on that object and select Run Now. Your data from Tableau CRM will be sent to Snowflake.
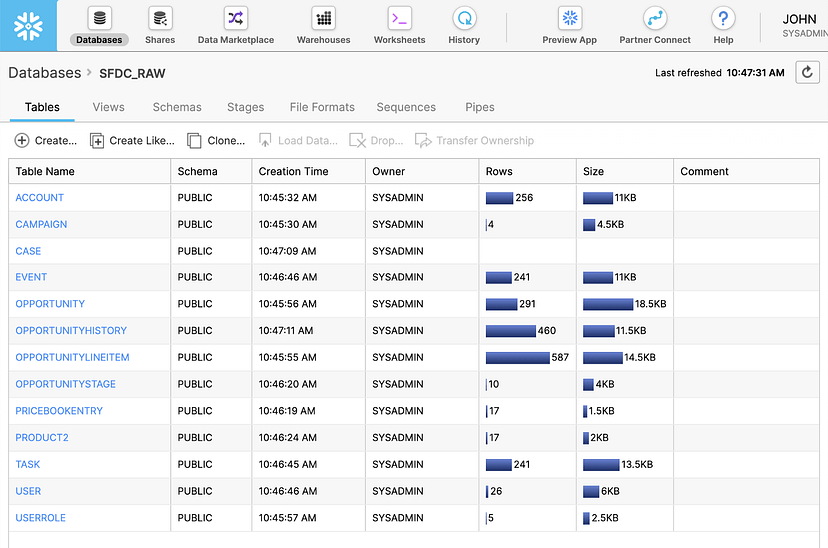
You can navigate back to your Snowflake account, where your Salesforce data is readily available. After Salesforce and Snowflake have been successfully integrated, you can proceed to perform advanced analytics on your data.
Limitations of Data Synchronization Using Tableau CRM Sync Out Feature
The native integration may have limitations when it comes to complex data transformations or data cleansing requirements. In some cases, additional data processing or data preparation steps may be required before transferring data to Snowflake.
Another notable challenge is how formula fields are handled. Tableau's API might not read these fields correctly, adding complexity when dealing with intricate Salesforce formula fields that span multiple objects. Local data source structures can also cause problems, often resulting in errors due to table limitations.
Method 2: Using Bulk API for Salesforce to Snowflake Data Migration
Salesforce provides different general-purpose APIs that you can use to access Salesforce data. The general-purpose APIs include:
- REST API
- SOAP API
- Bulk API
- Streaming API
You can use the Salesforce Bulk API to access and load data from Salesforce to Snowflake. The Bulk API supports CSV, JSON, and XML file formats. Here are the steps to follow for this method:
Step 1: Extracting the Data from Salesforce
- Log in to Salesforce API.
- Create a job to download Account object data from Salesforce in JSON format.
- Add a batch containing a SQL query to the job you created. This is to get the Salesforce data.
- Check the batch status to see if it’s Completed or Failed.
- When the batch status updates to Completed, download the result dataset, which will be in JSON format.
- After retrieving the results, close the job.
Step 2: Loading the Data to Snowflake
- Create a Snowflake stage, which is the location where Snowflake stores data files and can access them.
- Next, create the file format in Snowflake. Use the File Format menu to create a file format to read a JSON file.
- Use the Stage and File Format to bulk load the Salesforce JSON file and load the data into Snowflake.
This will successfully load your Salesforce data into a Snowflake table. For a more detailed guide on how to use Salesforce Bulk API to connect Salesforce to Snowflake, you can read this article.
Method 3: Using Data Loader for Salesforce to Snowflake Integration
Data Loader is a third-party, web-based application that allows you to easily manage the import/export of data between Salesforce and other systems. You can use it to insert, update, delete, or export Salesforce records. Data Loader supports operations with large files with up to five million records per sync.
To implement Data Loader, you can follow these steps:
- Install Data Loader on your Windows or MacOS: Execute the installer file. Then, select and download Data Loader and its installer.command file.
- Configuration: Configure Data Loader. Refer to the detailed documentation for more information.
- Execute the Data Loader: Use batch mode or Data Loaded CLI to execute it.
Method 4: Steps to Replicate Salesforce to Snowflake with Estuary Flow
SaaS alternatives like Estuary Flow can provide a more efficient and streamlined real-time approach to replicating data from Salesforce to Snowflake. Flow is a DataOps platform offering a cloud-native solution for seamless integration and data synchronization between applications and storage systems.
Flow enables real-time data replication, keeping your Snowflake database synchronized with the latest Salesforce data. This is crucial for real-time analytics and operational insights, allowing you to make informed decisions on the fly.
Flow's cloud-based infrastructure can scale resources dynamically to handle growing data volumes. Whether you have a small or massive dataset, it can adapt to your needs, ensuring efficient replication without compromising performance. In addition to Snowflake, Estuary Flow can write to other destinations such as MongoDB, BigQuery, Snowflake, Postgres, and more.
Now, let's look at the step-by-step process to understand how it works.
Step 1: Capturing Data from Salesforce with Estuary Flow
- Sign in to your Estuary account or sign up for free. Once logged in, click on Sources.
- In the Sources window, click on + NEW CAPTURE.
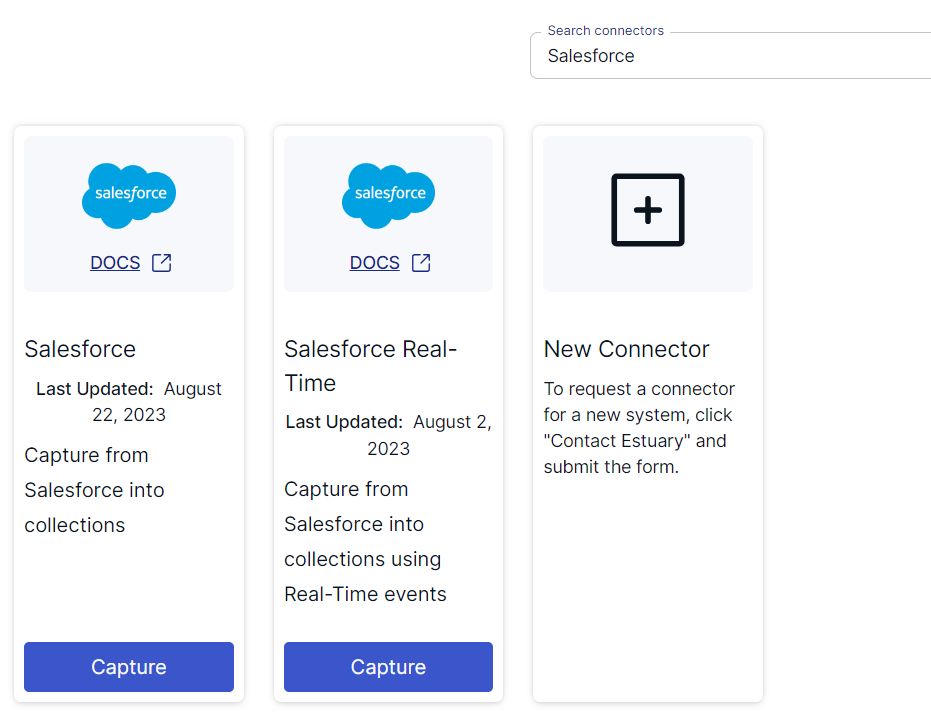
- On the Create Capture page, search for Salesforce. You will find two connectors:
Salesforce: This connector captures data from Salesforce objects into Flow collections. It uses batch processing and is ideal for syncing your historical Salesforce data.
Salesforce Real-Time: This connector captures data from Salesforce objects into Flow collections in real time via the Salesforce PushTopic API.
- In this case, we are using the Salesforce connector; you can choose the one that best fits your needs. Then, click on Capture.
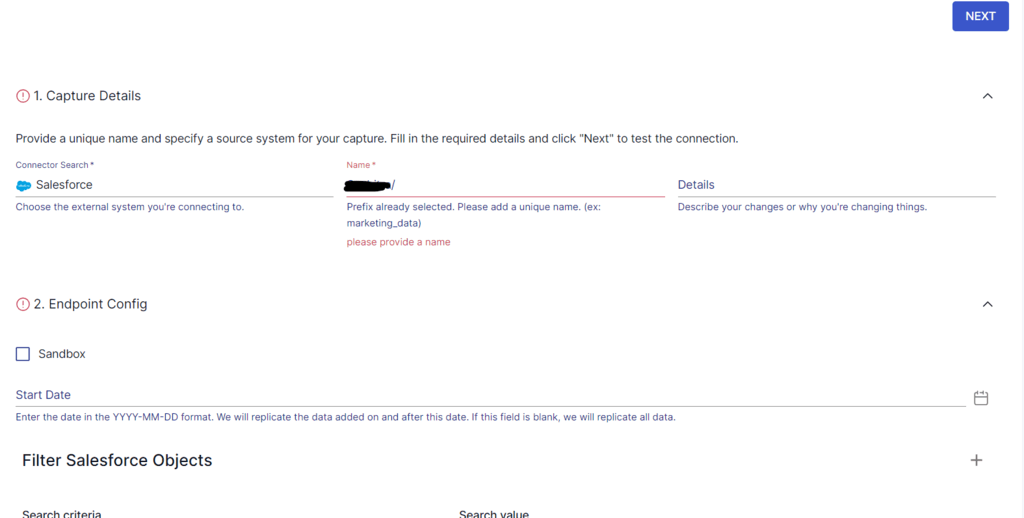
- Give the capture a name and fill in the details of your source database, including the Start Date, Search criteria, and Search value.
- Once you have filled in all the details, click on NEXT. Estuary Flow will establish a connection with your Salesforce account and identify the data tables.
- Click SAVE AND PUBLISH to save the capture configuration.
Step 2: Setting up Your Snowflake Destination in Estuary Flow
- After a successful capture, you can either click on Materialize Collections in the pop-up or go to the Estuary dashboard and click on Destinations on the left-side pane.
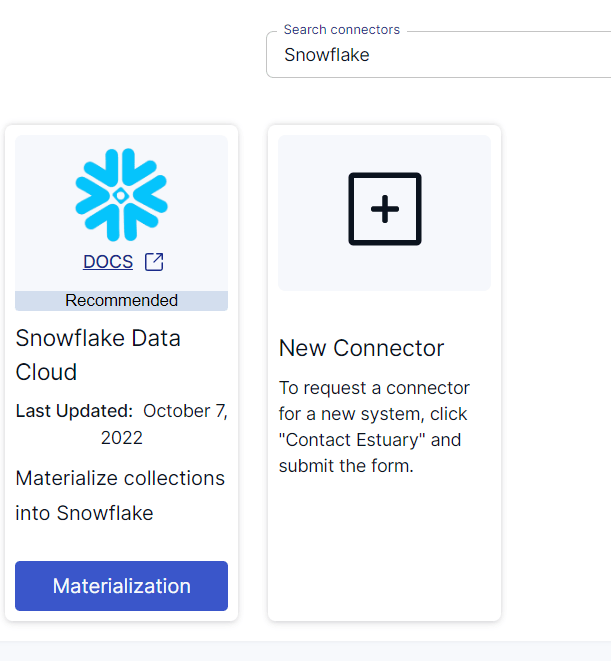
- Click New Materialization to set up the data destination. On the Create Materialization page, search for Snowflake and click on Materialize.
- Snowflake has some prerequisites to meet before connecting to Flow successfully. So, before you continue, follow the steps here.
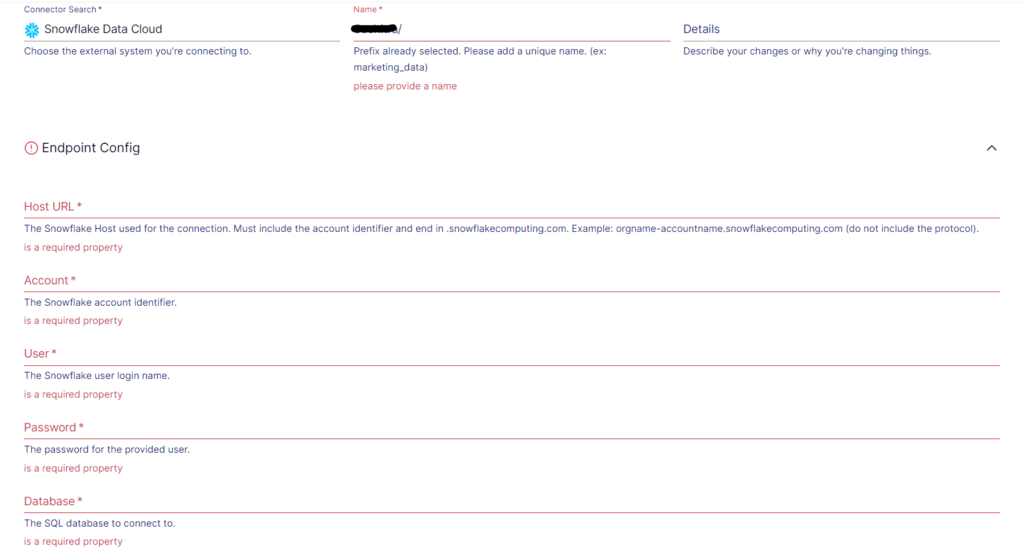
- Provide the Materialization name and Endpoint config details, such as the Host URL, User, Password, Database, Schema, Warehouse, and Role. Click on Next.
- The data collections you captured from Salesforce may already be populated. If not, use the Source Collections tool to locate and add them.
- Finally, click on Save and Publish. After you complete these steps, Estuary Flow will replicate your data from Salesforce to Snowflake in real-time.
For more help, see the Estuary documentation for:
- How to create a Data Flow?
- Salesforce Historical Data Source Connector
- Salesforce Real-Time Data Source Connector
- Snowflake Materialization Connector
Unlock real-time insights by integrating Salesforce with Snowflake using Estuary Flow’s no-code solution. Start your free trial or contact us for support.
Conclusion
Integrating Salesforce data into Snowflake offers significant benefits for organizations, including centralized data management, scalability, and advanced analytics. Salesforce provides comprehensive CRM solutions, while Snowflake offers powerful data warehousing capabilities. This powerful combination unlocks advanced analytics, streamlines data management, and enables scale-driven decision-making.
This guide covers four methods for connecting Salesforce to Snowflake: the Sync Out feature, Bulk API, Data Loader, and Estuary Flow. Each method caters to different needs and technical skill sets.
Among these methods, robust, no-code SaaS tools like Estuary Flow provide a seamless, secure, real-time integration with minimal manual effort. Additionally, Flow provides a user-friendly interface, automated schema management, and a secure cloud-based environment, making the complex task of data integration surprisingly simple.
Ready to unlock the power of your Salesforce data?
Estuary Flow provides over 100 pre-built connectors, including the Salesforce to Snowflake connector. Start using Flow today to leverage its extensive features!
Related Article

Author
Popular Articles


