Google Firestore is a flexible, scalable NoSQL database that allows real-time data synchronization for mobile and web applications. However, as your data grows, the need for more complex querying, analysis, and reporting often arises. This is where Amazon Redshift comes in. Redshift is a powerful data warehouse solution designed for massive-scale data analysis, offering robust SQL querying capabilities and advanced analytics.
Integrating Firestore to Redshift allows you to leverage Redshift’s powerful analytics to perform complex queries, generate detailed reports, and gain deeper insights from your Firestore data. This guide will show you two easy ways to load data from Firestore to Redshift: one automated method using Estuary Flow, and a manual approach via Google Cloud Storage and Amazon S3.
But if you’re a seasoned professional who is already familiar with these tools, jump right into the methods to quickly load data from Firestore to Redshift.
What is Firestore? Overview
Google Firestore is a flexible and scalable NoSQL cloud database designed for building mobile and web applications. It allows for real-time data synchronization across devices, making it ideal for dynamic applications that require immediate updates. Firestore operates with a document-based model, storing data in collections and documents similar to JSON structures. This enables the management of semi-structured and unstructured data with ease, offering a great solution for applications that handle dynamic, constantly evolving datasets.
Key features of Firestore include automatic scaling, real-time data updates, and strong integration with other Google Cloud services. However, while Firestore excels in operational databases for application development, its querying capabilities are limited when it comes to large-scale analytics and complex reporting, which is where data warehouses like Redshift come in.
What is Redshift? Overview
Amazon Redshift is a fully managed, petabyte-scale data warehouse service offered by Amazon Web Services (AWS). Built for massive data storage and high-performance analytics, Redshift enables users to run complex SQL queries across large datasets quickly and efficiently. It’s designed for scalable, distributed computing, allowing businesses to analyze data in parallel across multiple nodes for fast results, even with billions of rows.
Redshift's architecture supports columnar storage, which optimizes data compression and query performance. This makes it an excellent choice for handling data aggregation, reporting, and advanced analytics. Redshift also integrates well with a wide range of business intelligence and data visualization tools, enabling users to generate insights and reports with ease.
Redshift is especially suited for organizations that need data warehousing solutions to perform deep analysis, business intelligence reporting, and large-scale data processing that exceeds the capabilities of NoSQL databases like Firestore.
Here are some key features of Amazon Redshift:
- Columnar Storage: Redshift uses columnar storage to store data in columns rather than rows. This reduces the amount of data read from storage during queries, significantly improving response times and overall query performance. Columnar storage is particularly beneficial for analytics workloads, where queries often involve scanning and aggregating large datasets.
- Scalability: Redshift offers seamless scalability without the need to manage physical hardware. You can easily expand both data storage and compute resources as your data grows. Redshift leverages AI-driven scaling techniques, which dynamically adjust resources based on your workload patterns, ensuring optimal performance even as demands fluctuate.
- Concurrency Scaling: Redshift's concurrency scaling ensures that multiple users can run simultaneous queries without impacting performance. When the system detects increased workload demands, it automatically adds extra capacity to handle the additional queries. This ensures consistent performance and fast query execution, even during peak times or when handling multiple complex queries.
Why Connect Firestore to Redshift?
- Structured Querying & Advanced Analytics: Firestore lacks native SQL support and advanced querying capabilities. By connecting to Redshift, you unlock full SQL querying and the ability to perform complex data analytics, providing deeper insights for decision-making.
- High-Performance Data Processing: Redshift handles data at scale with columnar storage, data compression, and massively parallel processing (MPP), allowing you to efficiently process and analyze large volumes of Firestore data without sacrificing performance.
- Business Intelligence Integration: Redshift integrates seamlessly with BI tools like Tableau, Looker, and Power BI, enabling you to generate detailed reports and visualize data easily, enhancing your ability to make data-driven decisions.
2 Effective Methods for Connecting Firestore to Redshift
You can connect Firestore to Redshift using two methods: an automated way via Estuary Flow or a manual approach using Google Cloud Storage and Amazon S3.
- The Automated Way: Using Estuary Flow to Integrate Firestore to Redshift
- The Manual Way: Using Google Cloud Storage and Amazon S3 to Load Data from Firestore to Redshift
Method 1: Using Estuary Flow to Integrate Firestore to Redshift
Estuary Flow is a robust ETL (Extract, Transform, Load) and CDC (Change Data Capture) platform. You can use it for real-time integration of data between Firestore and Redshift.
Setting up a continuous data pipeline with Estuary Flow only takes a few minutes. Its no-code configuration and user-friendly interface help simplify the setup process.
Beyond Firestore and Redshift, you can also build and test integration pipelines to streamline data flow across multiple systems, including databases, APIs, and cloud storage.
Prerequisites
- A Google service account with read access to your Firestore database.
- An Amazon Redshift cluster and an S3 bucket for temporary staging.
- An Estuary account.
Steps to Integrate Firestore to Redshift Using Estuary Flow:
Step 1: Configure Firestore as Your Source
- Sign in to your Estuary account.
- Click the Sources option from the side menu.
- On the Sources page, click on the + NEW CAPTURE button.
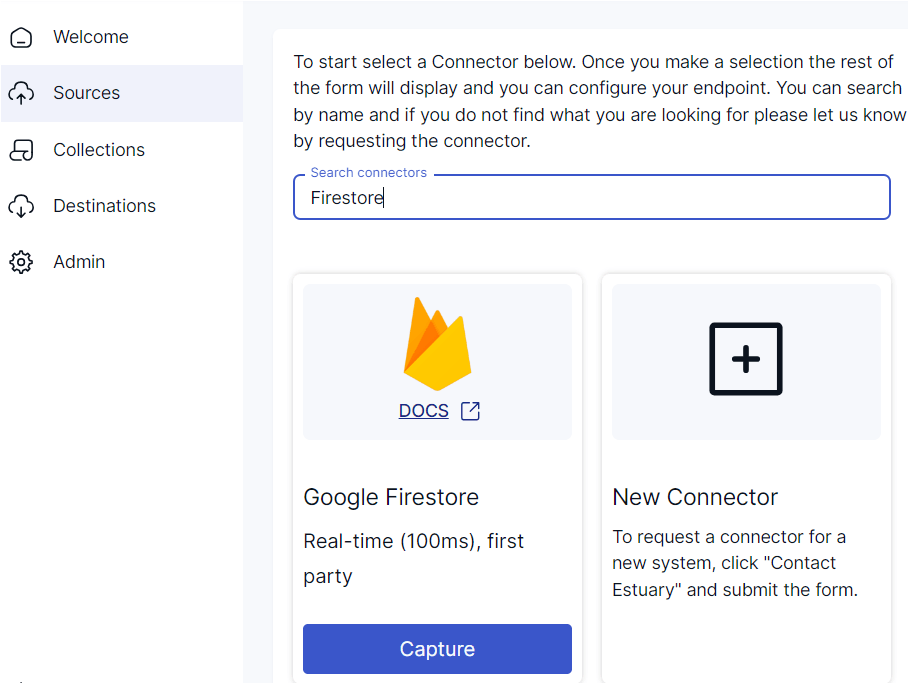
- The Create Capture page has a Search connectors field, which you can use to find the Firestore connector.
- When you see the connector in the search results, click its Capture button.
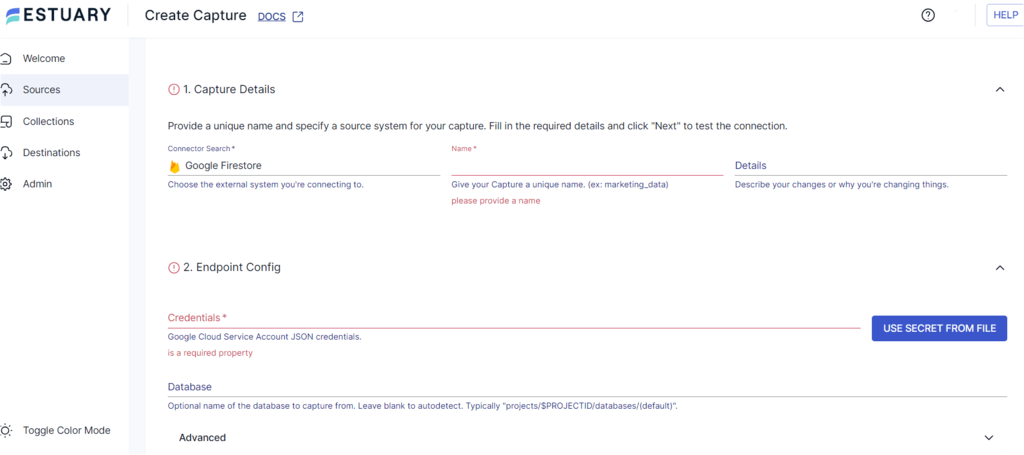
- On the Firestore Create Capture page, specify the following details:
- Insert a unique Name for your capture.
- Provide your Google Service account JSON Credentials in the Endpoint Config section.
- Click NEXT. Then, click SAVE AND PUBLISH.
The real-time Firestore connector will capture the data from your Google Firestore collections into an Estuary Flow collection with millisecond latency.
Step 2: Configure Amazon Redshift as Your Destination
- To start configuring the destination end of your data pipeline, click MATERIALIZE COLLECTIONS in the pop-up that appears following a successful capture.
Another way is to navigate to the Estuary dashboard and select Destinations from the side menu.
- On the Destinations page, click on the + NEW MATERIALIZATION button.
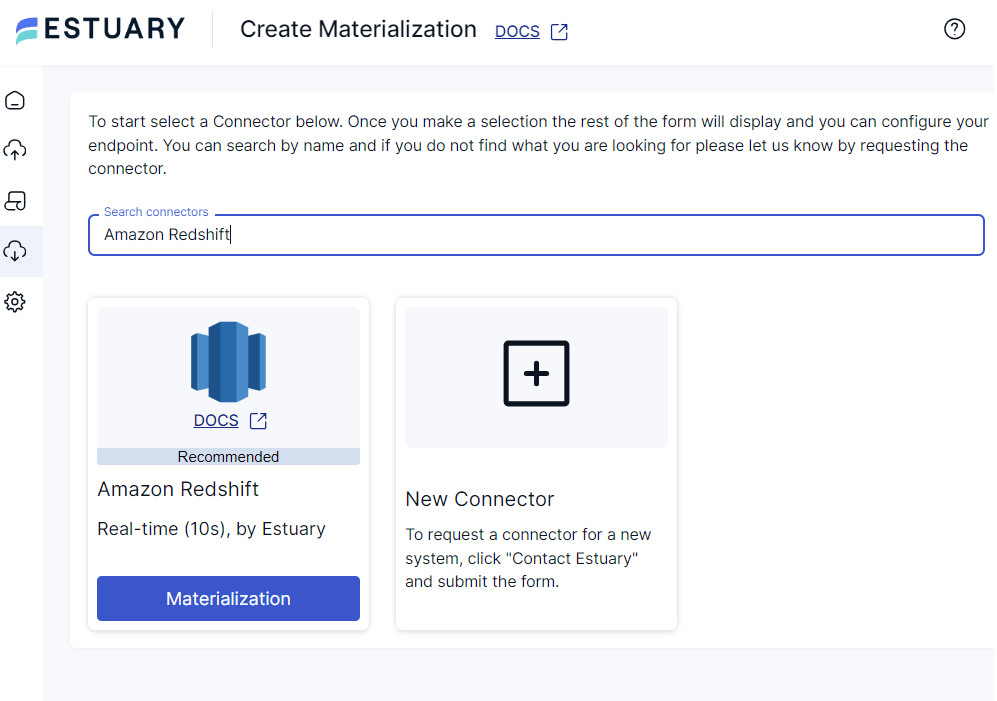
- The Create Materialization page has a Search connectors field. Use this field to search for the Amazon Redshift connector.
- When you see the connector, click on its Materialization button.
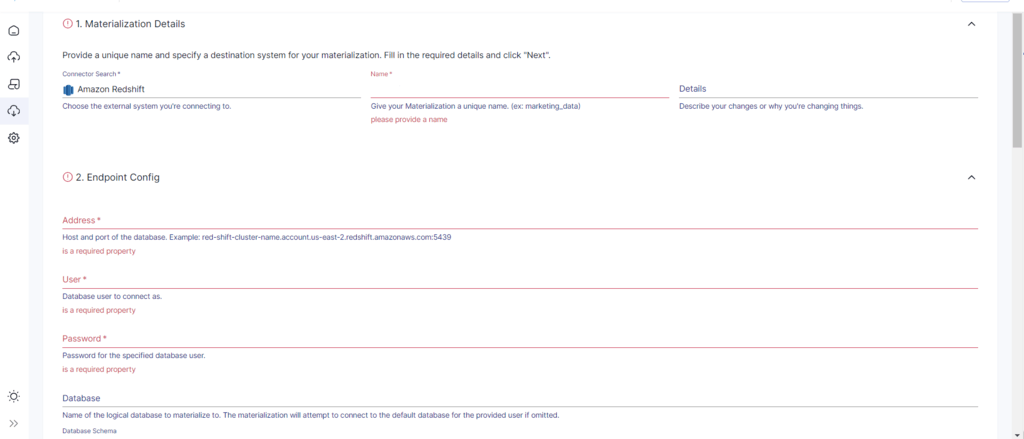
- On Amazon Redshift Create Materialization page, specify the following information:
- Enter a unique Name for your materialization.
- In the Address field, specify the host and port of your Redshift database.
- Provide the database User and Password to connect.
- Specify the name of the S3 Staging Bucket, which will be used for staging the data loads.
- Provide the AWS Access Key ID and Secret Access Key, which will be used for reading and writing data into the S3 bucket.
- Provide the Region of the S3 staging bucket.
NOTE: The collection of your Firestore data in the capture will automatically be added to the materialization. However, you can manually add a capture to your materialization through the Source Collections section.
- After specifying all the mandatory fields, click NEXT > SAVE AND PUBLISH.
The connector will materialize Flow collections of your Firestore data into tables in your Redshift database.
Benefits of Using Estuary Flow
- Extensive Library of Connectors: Estuary Flow offers 100s of batch and streaming connectors. These pre-built connectors simplify integration with data warehouses, data lakes, databases, and SaaS applications.
- Automated Schema Evolution: Estuary Flow’s schema evolution feature automatically handles changes in the data schema. The evolutions result in data materialized to a new resource in the endpoint system or the re-creation of the Flow collection with a new name.
- Change Data Capture (CDC): Estuary Flow supports streaming CDC with incremental captures. With this, you can connect to a source and immediately start reading a stream while also capturing its (24-hour) history. This combined stream is sent to the destination with sub-100ms latency for a real-time transfer or with any batch interval.
Method 2: Using Google Cloud Storage and Amazon S3 to Load Data from Firestore to Redshift
This method involves exporting data from Firestore and transforming it before importing it into Redshift.
While this approach involves considerably more effort and time than automated solutions like Estuary Flow, it does provide flexibility to help manage your data transfer process.
Let’s look into the steps involved in performing a Firestore-Redshift integration the manual way:
Prerequisites
- Enable Billing: You must enable billing for your Google Cloud project. This is necessary to use Google Cloud Services such as Firestore and Google Cloud Storage.
- Create a GCS Bucket: Create a Google Cloud Storage bucket in a geographic location close to your Firestore database. This helps enhance the data transfer efficiency and minimize latency.
- Create an S3 Bucket: Create an Amazon S3 bucket in a geographic location close to your Redshift cluster.
- A Redshift Cluster: Ensure that you have an Amazon Redshift cluster ready to ingest the data.
- Permissions: Ensure you have the necessary permissions for:
- Firestore to export data
- Google Cloud Storage to create a bucket and perform read/write operations
- Amazon S3 to create a bucket and handle data operations
- Redshift to create tables and load data
Step 1: Export Data from Your Firestore Database
This step involves using the Firestore Export/Import service to export your Firestore data collections into a Google Cloud Storage bucket.
- Navigate to Cloud Firestore on the Google Cloud Platform Console.
- Click on the Import/Export option in the side menu of the Firestore database page.
- Click on Export on the Import/Export page and then select Export entire database or Export one or more collection groups.
- Choose a destination for the data. You can either enter the name of your Google Cloud Storage bucket or click on BROWSE to select an existing bucket.
- Click on Export to start the export process.
Upon completion of the export, your GCS bucket will have a folder with:
- An export_metadata file of each collection.
- Files of the exported Firestore collections.
The exported Firestore data must be converted to CSV or JSON format to ensure compatibility with Redshift.
You can read about Firestore data export in JSON file format here: How to export Firestore Data to JSON File.
Step 2: Download Data from the GCS Bucket
- In the side menu of the Google Cloud Console, click on Buckets to view all available GCS buckets.
- Select the bucket that contains your exported Firestore data. Click on the name of the bucket to view its details.
- On the bucket details page, ensure the Objects tab is selected. You will see a list of all objects stored in the bucket.
- Click on the Download option associated with the Firestore data file in the bucket to save it to your local system.
NOTE: Google Cloud Storage supports storing data in formats like JSON, XML, and Google Protocol Buffers. If your data isn’t in a Redshift-compatible format (like CSV or JSON), then transform it to ensure seamless integration.
Step 3: Upload the File from Your Local System to Amazon S3
- Navigate to the AWS Management Console.
- Select the S3 service under Storage.
- Find the S3 bucket where you want to upload the file. Click on the bucket name to open it.
- Inside the bucket, click Upload.
- In the Upload wizard, click on Add Files.
- Select the file you downloaded from the GCS bucket to your local system.
- Click the Upload button in the wizard to start loading your file to your S3 bucket.
Step 4: Import Data from S3 Bucket to Amazon Redshift Instance
You can use the COPY command in your Amazon Redshift Query Editor to load data from the S3 bucket to the Redshift instance.
plaintextCOPY table_name [ column_list ] FROM data_source CREDENTIALS access_credentials [options];Here:
- table_name is the target table in your Redshift database where the data will be copied.
- column_list refers to the columns in the target table that match the data structure of the source file. This is an optional field.
- data_source is the S3 bucket URL of your data file.
- access_credentials refers to authorization details, which would include either IAM roles or access keys.
Limitations of Using Manual Export/Import to Load Data from Firestore to Redshift
- Time-consuming and Effort-intensive: The entire process requires intensive manual efforts and time. Despite being functional, it involves repetitive tasks that make it inefficient for frequent data transfers.
- Lacks Real-time Integration Capabilities: The delays involved in this approach result in considerable data transfer latency. This doesn’t make it a good choice for applications requiring real-time data for analytics or decision-making.
- Data Integrity Issues: Due to the human intervention involved in this manual process, it is susceptible to errors. Missed values, improper data transformations, or repetitive values result in reduced data quality and integrity.
- Data Security Risks: During the stages of exporting Firestore data and importing it into Redshift, there’s a possible risk of data being exposed to unauthorized users. This can compromise the security of your data, often going undetected immediately.
Conclusion
Integrating data from Firestore to Redshift enables you to perform large-scale data processing and advanced analysis, unlocking deeper insights from your Firestore data.
While the manual export/import method can get the job done, it lacks real-time synchronization and poses potential data security risks.
A more efficient option is using an ETL tool like Estuary Flow, which automates the integration process and supports real-time data syncing through change data capture (CDC). This approach not only improves operational efficiency but also ensures seamless, secure data workflows for more reliable insights.
Sign up today for your Estuary Flow account. It’s the first step towards efficient data transfer and synchronization between multiple data sources and destinations apart from the Firestore-Redshift connection.
FAQs
Can Firestore handle complex analytical workloads on its own?
Firestore is ideal for real-time data synchronization but lacks the robust analytical capabilities necessary for complex queries, reporting, and in-depth analysis. It doesn’t offer native SQL support or advanced processing features like parallel execution or aggregations found in Redshift. If your goal is to derive detailed insights and generate sophisticated reports, migrating Firestore data to a data warehouse like Redshift is essential.
What is the easiest way to integrate Firestore with Redshift without complex coding?
While manual data integration can be complex and time-consuming, you can streamline the process using a tool like Estuary Flow. Estuary Flow provides no-code connectors that make it easy to sync data between Firestore and Redshift in just a few clicks. By automating data pipelines and avoiding custom code, Estuary ensures real-time data integration without the operational overhead, allowing you to focus on analyzing and leveraging your data instead of managing the infrastructure.

About the author
Rob has worked extensively in marketing and product marketing on database, data integration, API management, and application integration technologies at WS02, Firebolt, Imply, GridGain, Axway, Informatica, and TIBCO.
Popular Articles


